
Friday 30 November 2012
Flooding on the Great River Ouse.
Below is a video I took of the local flooding on the Great River Ouse.
Thursday 11 October 2012
New Etsy Shop.

Sunday 8 April 2012

Thursday 22 March 2012
East of England Drought.
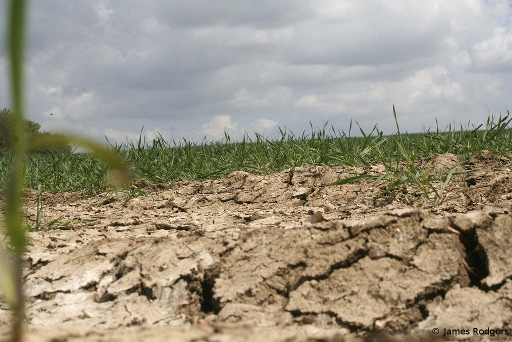
Here in the East of England, UK, we are at current in a state of drought. We have not had any proper rain for a number of weeks. This image I wanted to share with you shows how bad the fields are looking at the moment. Give us rain!
Panorama Photography.
I have been into doing Panoramic images for a while now. I am going to share
with you these three images I have done recently.
The second image is of a trip to the beach in Caister, Norfolk. Taken in
the middle part of 2011, it consists of thirteen different images stitched
together.

The last one is of a recent visit up to Leeds. This is a dusk shot of
Yeadon Tarn which is used for sailing. During the Second World War, the Tarn was
drained to prevent the enemy aircraft from using its reflection to identify the
nearby Avro factory. Thirteen images were used to stitch this one
together.
Monday 12 March 2012
Create a print texture: Tutorial.
I like to make my own textures so I can use them in my work by scanning them. I
am going to share this one with you. It takes about 5 minutes to create.
Depending on what type of ink you use, you will need to wait a couple of hours
for it to dry.

First of all, you are going to need paper to print onto. I chose to use heavyweight and watercolour paper. However, a decent cartridge paper will do.

For the printing, you are going to need: a printing roller, printing ink, and also Perspex plastic to spread the ink onto. (An old plate would also work for this.) You want to start off by spreading the ink onto the plastic with the roller. Don't use too much! A little will go a long way.

Once you have loaded up your roller, you can roll it onto your paper. You do not want to roll too much colour onto the paper, as this will lead to a block of solid colour with no texture.

I hope this tutorial has been helpful.
Saturday 10 March 2012
Dude.

Here is a picture of something I have been creating the last couple of days. As you can perhaps see, he is a bit of a "dude with attitude".
This work was painted using Acrylic paint on Daler Rowney heavyweight
paper. I have found this paper to be nice and smooth, ideal for pen and ink
work. It will also handle washes of colour without being stretched.
Hope you like!
Thursday 8 March 2012
New Banner.
Hi everyone:
I have designed my own text to be used in the title banner for this blog,
as seen in the pictures posted below.
The first picture: Here you can see the two ideas from the early stages
sketched up in pencil.

The second picture: The end product of the design I chose to use. I used a 0.3 pen to ink up the outlines of each letter and then filled them in using acrylic.

I hope you like the end result!
Monday 5 March 2012
Welcome!
For those of you who know me from Flickr or have come from my website: welcome to my blog! Also, a big welcome to those new to this blog.
First of all, I ought to explain: why am I doing this blog? Well, I will be using it to showcase my latest work: from rough work, to finished work.
I do a wide range of work. This includes: graphic design, artwork, web design, as well as photography.
I hope you find the blog enjoyable to read and I hope to be able to swap ideas and tips along the way.
Subscribe to:
Posts (Atom)